Battery switch on travel trailer function is crucial for managing your RV’s power. Understanding how these switches work – from the simple disconnect to more complex 1-2-both systems – is key to preventing electrical issues and maximizing battery life. This guide breaks down everything you need to know, from installation and troubleshooting to safety and upgrades, ensuring you’re well-equipped to handle your travel trailer’s electrical system with confidence.
We’ll explore the different types of battery switches, their ideal locations, common problems and how to fix them, and how they integrate with other RV electrical components like converters, inverters, and solar panels. We’ll also cover important safety precautions to keep you and your RV safe.
Battery Switch Types in Travel Trailers
Choosing the right battery switch for your travel trailer is crucial for managing your power system effectively and safely. Different switches offer varying levels of control and protection, impacting your ability to charge batteries, use appliances, and prevent accidental discharges. Understanding these differences will help you make an informed decision.
Types of Battery Switches
Travel trailers typically utilize a few common types of battery switches. These switches control the flow of power between your trailer’s batteries and the various electrical systems. The primary types include 1-2-Both switches and disconnect switches.
1-2-Both Battery Switches
A 1-2-Both switch is the most common type found in RVs and travel trailers. This switch offers three positions: “1” connects only the main battery (usually the house battery), “2” connects only the starting battery (for your tow vehicle’s engine), and “Both” connects both batteries in parallel. This parallel connection allows both batteries to power the trailer’s systems and share charging from the alternator or shore power.
Advantages and Disadvantages of 1-2-Both Switches
- Advantages: Provides precise control over which battery or batteries are in use. Allows for charging both batteries simultaneously. Simple to operate.
- Disadvantages: Can be a single point of failure. If the switch malfunctions, it can completely cut off power to the trailer. Some designs can be less robust than disconnect switches.
Disconnect Switches
Disconnect switches, often called battery disconnect switches, are simpler devices. They typically have only two positions: “On” and “Off.” In the “On” position, they allow power to flow from the battery to the trailer’s systems. In the “Off” position, they completely isolate the battery from the trailer’s electrical system, preventing any drain on the battery when the trailer isn’t in use.
Advantages and Disadvantages of Disconnect Switches
- Advantages: Simple design, generally very reliable, prevents parasitic drain on the battery when the trailer is not in use. Often more robust than 1-2-Both switches.
- Disadvantages: Less control over battery usage compared to 1-2-Both switches. Does not allow for charging multiple batteries simultaneously unless supplemented with a separate charging system.
Installing a Typical Battery Switch
Installing a battery switch requires basic electrical knowledge and tools. It’s generally recommended to consult a professional electrician if you’re unsure about any aspect of the process. The process usually involves disconnecting the battery, mounting the switch securely, running appropriately sized wiring to the switch and battery terminals, and carefully connecting all wires according to the switch’s wiring diagram.
Always ensure proper insulation and use appropriately sized fuses or circuit breakers for safety. Incorrect wiring can lead to short circuits or damage to your electrical system. Failure to follow manufacturer’s instructions can void warranties and create safety hazards.
Battery Switch Location and Accessibility

Finding your travel trailer’s battery switch quickly can be a lifesaver, especially in emergencies. A poorly placed switch, however, can turn a simple task into a frustrating and potentially dangerous one. Easy access is key for safety and convenience.The ideal location for a battery switch balances ease of access with protection from the elements and accidental activation. Typical locations include inside a dedicated compartment near the battery itself (often under a hinged access panel), within a lockable storage area near the tongue of the trailer, or even inside a weatherproof junction box mounted on the exterior, but still relatively accessible.
So, you’re planning a trip? Awesome! Before you jet off, remember travel insurance is key. Check out Aon travel insurance for comprehensive coverage; they’re known for their solid reputation. Then, if you’re heading somewhere adventurous, like a beach trip, make sure to compare options like Aon travel insurance to ensure you’re covered for all your activities.
Don’t leave home without it!
However, many RVs have switches tucked away in less-than-ideal spots.
Typical Battery Switch Locations and Accessibility Issues
Many manufacturers place the battery switch in less-than-convenient locations. This can range from being buried deep inside a compartment requiring tools or contortions to reach, to being situated in a location exposed to the elements or difficult to find in the dark. Poorly labeled or unmarked switches also contribute to accessibility problems. For example, a switch hidden behind a panel requiring removal of several screws presents a clear accessibility issue.
Similarly, a switch located under the trailer, requiring you to crawl underneath, poses a safety risk and is far from convenient.
Improving Battery Switch Accessibility
If your battery switch is hard to reach, several improvements can be made. Relocating the switch entirely is a significant undertaking, usually requiring rewiring, but sometimes a simple solution like adding a clearly labeled, easily accessible extension switch in a more convenient location can solve the problem. This extension switch can be wired in parallel with the original switch, offering a secondary point of control.
Another option involves improved labeling and lighting. A bright LED light near the switch, coupled with a large, clearly visible label, greatly enhances visibility and ease of use, especially in low-light conditions. Consider using high-contrast colors or reflective tape for enhanced visibility. For switches in hard-to-reach places, consider installing a longer handle or using a remotely operated switch (wired or wireless) to improve ease of access.
Optimal Battery Switch Placement Schematic
Imagine a simple schematic: The trailer’s tongue houses a lockable storage compartment. Inside this compartment, near the battery but not directly on top of it (to prevent accidental contact and potential short circuits), is the main battery switch. The switch itself is clearly labeled and well-lit by an internal LED. A secondary, weatherproof, clearly marked extension switch is located on the outside of the compartment’s door, easily accessible without opening the compartment.
This allows for quick disconnection in emergencies, while the main switch inside remains protected. Both switches are clearly marked with large, bold lettering, specifying their function (“Main Battery Switch” and “Exterior Access Switch”). The wiring is neatly organized and protected from potential damage. This design prioritizes safety and ease of access without compromising protection.
So, you’re planning a trip? Awesome! Before you pack your bags, remember travel insurance is key. Check out Aon travel insurance for comprehensive coverage; they’ve got options for various trip lengths and activities. And if you’re heading to a beach destination, consider Aon travel insurance too – they often have specific policies for water sports and other beach-related activities.
Getting insured is super easy; just compare plans and choose what fits your needs!
Troubleshooting Common Battery Switch Issues
Your travel trailer’s battery switch is a crucial component, ensuring power flows correctly to your appliances and systems. Problems with this switch can leave you stranded without power, so understanding common issues and how to troubleshoot them is essential for any RVer. This section will guide you through identifying and resolving problems with your battery switch.
Common Battery Switch Problems
Several issues can arise with your travel trailer’s battery switch, often stemming from the harsh environment it endures. Corrosion, loose connections, and internal switch malfunctions are the most frequent culprits. Corrosion builds up on terminals due to exposure to moisture and elements, hindering electrical conductivity. Loose connections can vibrate loose over time, resulting in intermittent or complete power loss.
Finally, the switch itself can fail due to age, wear, and tear, or simply from being overworked. Ignoring these problems can lead to more serious issues, including battery damage or even a fire.
Troubleshooting a Non-Functioning Battery Switch
If your battery switch isn’t working, a systematic approach is key. First, visually inspect the switch and its connections for obvious signs of damage, corrosion, or loose wiring. Look for any signs of burning, melting, or unusual discoloration. Next, use a multimeter to test voltage at various points in the circuit. Check the voltage at the battery terminals, then at the switch’s input and output terminals.
A significant voltage drop indicates a problem within the switch or its connections. If the multimeter shows no voltage at the battery terminals, the battery itself may be the problem and needs further investigation. If voltage is present at the battery and switch input, but not the output, the switch is likely faulty. If voltage is present at the battery and the switch input but low or absent at the output, then there’s a problem with the switch itself or its connections.
Cleaning and Maintaining Battery Switch Connections
Regular cleaning and maintenance are crucial for preventing battery switch problems. Begin by disconnecting the battery’s negative terminal to prevent accidental shorts. Use a wire brush or sandpaper to carefully clean the terminals and connections, removing any corrosion or buildup. Apply a dielectric grease to the cleaned terminals and connections. This grease protects against corrosion and moisture, ensuring a reliable connection.
After cleaning, reconnect the battery’s negative terminal and test the switch to ensure it’s functioning correctly. Regularly inspect your battery switch and connections (at least seasonally or before each trip) for any signs of corrosion or looseness.
Troubleshooting Flowchart
This flowchart will guide you through troubleshooting your non-functioning battery switch:
| Step | Action | Result | Next Step |
|---|---|---|---|
| 1 | Visually inspect switch and connections for damage or corrosion. | Damage found. | Repair or replace damaged parts. |
| No damage found. | 2 | ||
| 2 | Test voltage at battery terminals, switch input, and output using a multimeter. | No voltage at battery. | Check battery and charging system. |
| Voltage at battery, but not at switch output. | Clean and tighten connections; if problem persists, replace the switch. | ||
| Voltage at battery and switch output. | Check downstream circuits. |
Battery Switch and Electrical System Integration
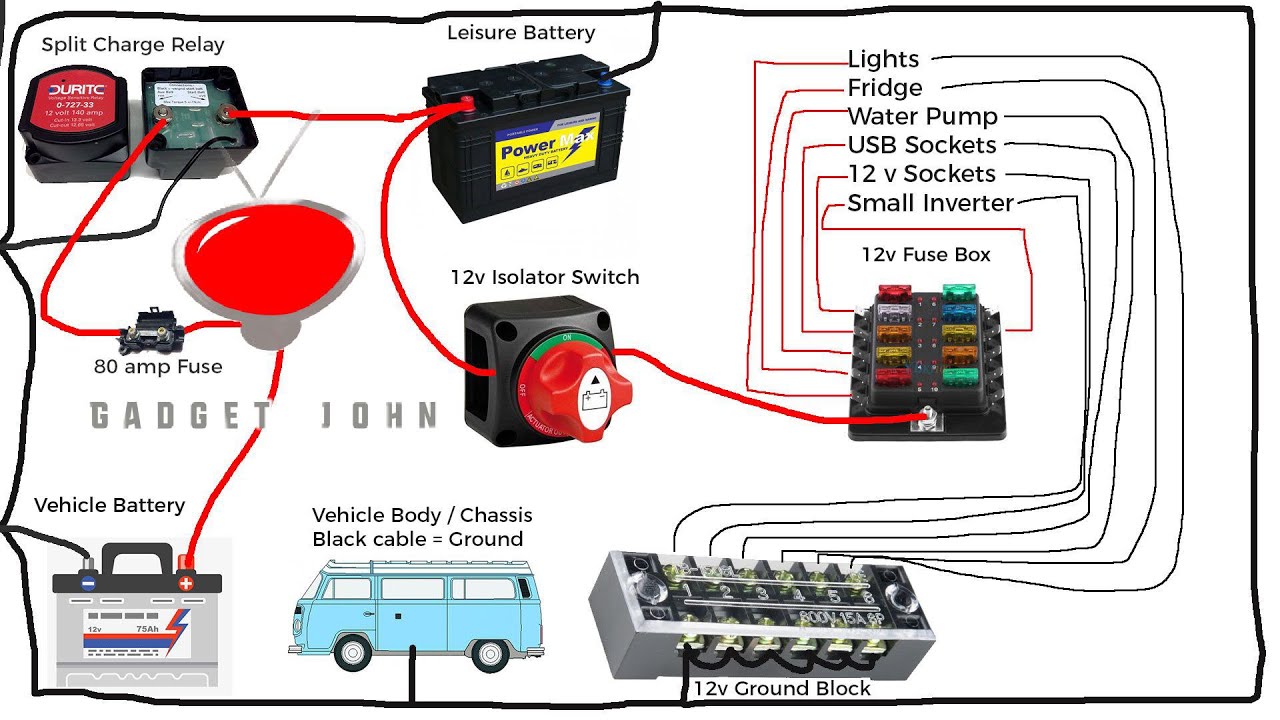
The battery switch is the central control point for your travel trailer’s 12-volt DC system. It’s not just an on/off switch; it dictates the flow of power from your batteries to various components, protecting your equipment and allowing for selective power management. Understanding its role is crucial for safe and efficient RV operation.The battery switch acts as a gatekeeper, controlling the flow of power from your house batteries to the rest of your trailer’s 12V system.
When engaged, it allows power to flow to components like lights, water pumps, and refrigerators (if they run on 12V). It also allows the converter to charge the batteries. When disengaged, it isolates the batteries, preventing drain and protecting sensitive electronics from accidental discharge. This is particularly important for long-term storage. The interaction with other systems is straightforward but vital.
Converter Interaction
The converter transforms 120V AC power from a campground hookup (or generator) into 12V DC power to charge the batteries. The battery switch allows the converter to charge the batteries only when engaged. With the switch off, the converter continues to provide 120V AC power to appliances that use it, but the batteries remain isolated. This prevents a situation where a faulty converter might overcharge or damage the batteries.
Inverter Interaction, Battery switch on travel trailer function
The inverter converts 12V DC power from the batteries into 120V AC power. It needs a power source, and that source is controlled by the battery switch. With the switch off, the inverter is without power and cannot function. This means no 120V AC power from your batteries to run appliances while boondocking (off-grid). The inverter will only operate when the battery switch is on and the batteries have sufficient charge.
Solar Panel Interaction
Solar panels generate DC power, and this power typically charges the batteries through a charge controller. The battery switch is downstream of the charge controller. While the solar panels still generate power even with the switch off, that power will not flow to the batteries; instead, it is typically blocked by the charge controller to prevent overcharging or damage.
When the switch is on, the power generated by the solar panels is directed to the batteries for charging.
Electrical Flow Diagram
| Component | Switch ON | Switch OFF |
|---|---|---|
| Batteries | Power flows to converter, inverter, and trailer loads. | Isolated; no power flows to trailer loads. |
| Converter | Charges batteries and provides 120V AC to appliances. | Provides 120V AC to appliances only. Batteries are not charged. |
| Inverter | Operates using battery power to provide 120V AC. | Inoperative; no power from batteries. |
| Solar Panels | Power charges batteries through the charge controller. | Power is blocked by the charge controller; batteries are not charged. |
| Trailer Loads (Lights, Pump, etc.) | Powered by the batteries. | No power. |
Mastering your travel trailer’s battery switch isn’t just about convenience; it’s about safety and extending the lifespan of your valuable equipment. By understanding the different switch types, troubleshooting common issues, and following safety guidelines, you can confidently manage your RV’s power and enjoy worry-free adventures. Remember to always prioritize safety and consult a professional if you’re unsure about any aspect of your RV’s electrical system.
Happy travels!
Essential Questionnaire: Battery Switch On Travel Trailer Function
What happens if my battery switch is corroded?
Corrosion can prevent proper electrical connection, leading to poor performance or a complete failure of your battery system. Clean the terminals with a wire brush and baking soda solution.
How often should I check my battery switch?
Inspect your battery switch at least once a year, or more frequently if you use your RV often, checking for corrosion, loose connections, and general wear and tear.
Can I use any type of battery switch in my travel trailer?
No, the appropriate switch depends on your battery setup and electrical system. Consult your RV’s manual or a qualified electrician to ensure compatibility.
What should I do if my battery switch is stuck?
Try lubricating the switch mechanism with a penetrating lubricant. If it remains stuck, it might require replacement.
